DIY Mongram Weekender Bag Tutorial
One of my new years resolutions is to find more time for me to enjoy all of the wonderful people in my life and to take a breath. Since I’m a college student and I work on weekdays the only real time I have (if any) is on the weekend.
I’ve only just realized the extraordinary value of weekends. I mean seriously in 2016 there are 105 days of weekend. This is a little over 28% of of the year which is substantial.
I’m hoping to take my weekends back by knuckling down a little more during the week and I invite you to as well. For all of my weekend outings and trips I of course wanted a cute and functional bag. In my current track of life it’s just not quite possible to drop a couple hundred dollars on a monogrammed weekender bag. So I made one!
Thank God for Hobby Lobby and their 40% off coupons. I chose this bag because it was most similar to the cutest one I had found, it had a pocket outside, was made out of canvas which is pretty durable and even had a zipper across the top!
Materials
tulip fabric paint
paintbrushes
transfer paper (gray if your bag is white/lighter in color)
pencil
computer, printer & paper
Time
about 1 hour
Making the Monogram
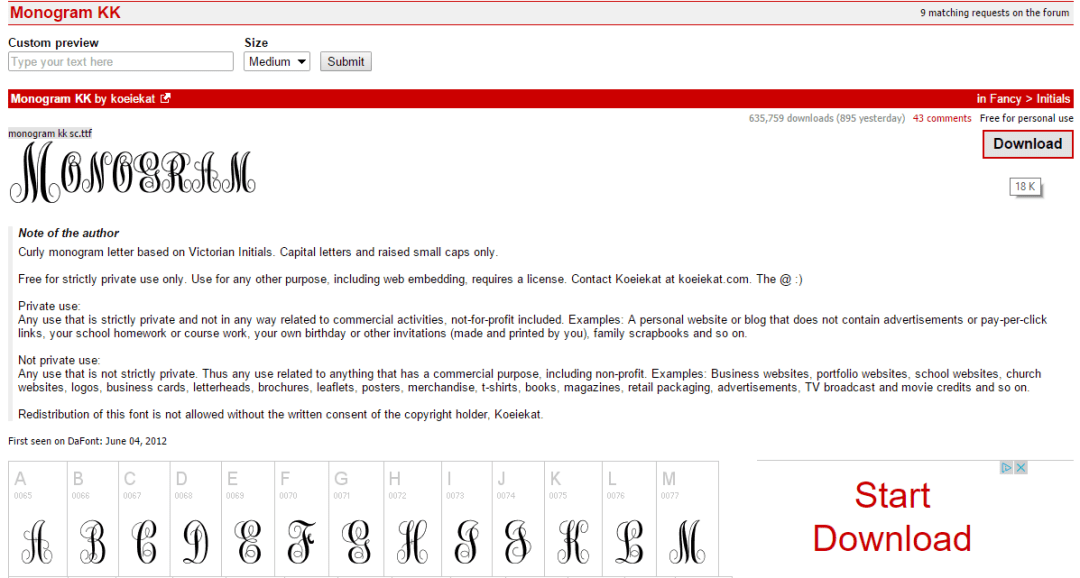
This part takes maybe ten minutes even if it does look complex I promise it’s way simple! A big thanks to Just a Girl and Her Blog’s Tutorial for showing me how to make a monogram in word. I’ve screen shotted my similar steps below:
You’re going to download a font by selecting the “download” box in the top right corner and it’s going to be totally painless. The monogram font I used can be found here and is free to download.

You’ll then select the “Open” option by right clicking your download (mine showed up at the bottom of my screen).

Next you’ll double click “monogram.kk.sc”.

Then you just select “Install”.

Bada Bing Bada Boom. Next you’ll just open up a word document and this font will be an option. I would highly suggest you check the option to show the ruler and gridlines at the top of the page to make sure all the initials are sized appropriately.

You’ll be inserting a simple text box.
Just select the appropriate font for the monogram and replace the current text in the text box with the right initial. Here’s an infographic about monogram etiquette if you’re not sure what goes where.

I used 200 size font for my letters on either side and it worked out great size-wise.

I chose no fill to see the grid better. Not that this matters as long as its white fill.

Just do the above steps for your other two letters. My middle and largest letter was size 300.

Now you made your monogram so print that bad boy out, it’s time to make your bag.
Making Your Weekender Bag
After trimming down the printed monogram tape it down on top of your transfer paper – preferably on all edges. If you’re transferring onto a white surface use dark transfer paper and vice versa. Do not be me and make two trips to Hobby Lobby in one day.

Once it’s secured you should tape it onto your bag so it doesn’t move. Next you can begin to trace it with a pencil. You’ll have to trace it probably about four times to be able to see the transfer well enough to do something with it.


It’ll look something like this when you’re done!


However, I did trace this afterwards again in pencil without the transfer paper so you all could see it. Don’t be discouraged if it isn’t this prominent when you’re done.


Now you’re all ready to paint! Grab the smallest paintbrushes you can find, pour some fabric paint in a bowl and go at it. I highly recommend keeping the monogram print out close at hand so you can make sure you’re painting it in correctly.


Continue for all of the letters.


Next you’ll need to do some clean up after the paint is dried. I mean going back in with more paint to make it appear more seamless. Finally I recommend using a brand new eraser to remove any remaining transfer substance.
I hope you enjoyed my tutorial. Where will you use your weekend bag?


I love this post, monograms and your blog! I can’t wait to read more 🙂
Thanks I’ll be sure to check out your blog too!:) I’m sure I’ll love it!
So cute! I can’t wait to try this out! 🙂
It was definitely worth it – and perfect for carrying around campus<3